Wednesday, 6 August 2014

5 Tips to Follow While You Walk


I have seen many people who don't have a proper walking style. Even if they have good personality, but not having proper walking style will affect their confidence, inner beauty and sometimes it reflect the persons character. By proper walking, we also have some health benefits and can maintain a balanced body.

So, to help out most of the people who are not having good walking style or who wanted to change their walking style, I wanted to list some of the tips which everyone has to follow while walking.

Always Keep Your Head High and Neck Long

According to bodyandsoul.com, walking with your head up and neck long will aligns trunk, engages shoulder muscles and activates stomach muscles. This is one of the health benefit by walking your head up and neck long. It also shows your confidence.

Don't make others to feel like you are an arrogant person while walking.

Always Take Long Steps

This is another point which you have to consider while you walk. Smaller steps means you have no confidence and longer steps, means you have confidence on yourself.

Take long steps, but not in a funny way.

Always Keep Your Spine Straight while Walking

Some of the people either bend forward or brand sideboards while walking. Always we should maintain straight body posture without leaning.

Don't walk like a robot. Just don't bend while walking.

Always Walk with Some Constant Speed

I mentioned constant speed because some of them walk very fast which looks funny and some walk very slowly, but actually everyone should walk at a constant speed like maintaining a speed between slow and fast. This is also another factor which shows the confidence of the person.

Make Sure Your Foot Places Straight while Walking

Some of them walk by placing their foot in a direction like placing crossly. Always place your foot straight and always imagine that you are walking on a straight line, which will help you to get better walking style.

That should not be like a catwalk, but you how to walk straight keeping your feet closer to each other.

Conclusion:

These are some of the factors which I think are the important things everyone should follow while walking. These are mainly for men and I don't know about women whether they have to follow these steps or not.

To get better walking style always wear shoes. In this way you can see your foot placement and can improve. Also, watch walking style of male models and some of the actors who has better walking style.

Different people have different walking styles but try to include these steps into your walking style. So, these are the some of the tips for better working and you know any other tips, please share with us. And if you found anything wrong please let me know.
Read more ...

Friday, 1 August 2014

How to Get a Free Heat Map for My Website?

When I searched for, 'How to get a Free Heat Maps for my site in Google, I haven't found any helpful articles or websites which let me to have a free heat map for my website. So, today I want to help some of the people who wanted a heat map for their website for free.

Let us start with the meaning of heat map.

What do you meant by Website's Heat Map?

Well, I tried to find some dictionary meaning of the word heat map, but found other definition of heat map, which is not relating to website. So I want to tell the definition in my own words. Website's heat map is a simple graphic representation of the visitor's behavior on website.

That means, we will get a clear representation in the form of color representation at a place where visitors are clicking.

What is the use of Heat Map?

Heat maps will let you know where your visitors are clicking and we can A/B test our website using these maps.

How to get a free Heat Map for my website?

In this post, I want to show and introduce you with a 'mostly not known' analytics solution for websites. And the new analytics solution is metrica.yandex.ru.

Metrica.yandex.ru is a free analytics solution of Yandex. This is similar to Google analytics, where you can create a new analytics account for your website and track your audience based on different demographics, regions, countries and many more.

So, to get a free heat map for a website. First, you how to create a new analytics account for your website and then use it for seeing your heat maps.

What's the process?

This is very simple to create a new analytics account. Let us see how to do.
  • Visit metrica.yandex.ru and register for a new account. Initially, this website will be in Russian language, so to get English language, scroll down to bottom and look for language options. Mainly language option will be represented by country's flag.


  • After registering your Yandex account, login to metrica.yandex.ru. At beginning, it will ask you to 'Add Counter' or if not, you can find an option called 'Add Counter'. Click on that. Type information about your website, the name of the website and other particulars of the 'General' tab. After completing click on 'Save'.


  • Now, you are given with the counter code which you have to place on your website. Tick 'WebVisor' box and copy the HTML code. For WordPress websites, copy the code and paste it in a widget. For blogger, paste the code in between <body and </body> of your template. After pasting the code, click on 'Save'.


  • Now you successfully added Yandex counter to your website. Visit your blogs Yandex analytics dashboard and go to Behaviour => Click Map as an below image.


  • Now you will see the link of your website and click on it.


  • You will be shown a heat map like below example heat map of Yandex.


  • It will take some time to get heat map of your website. In this way you can get free heat map of your website.

Conclusion:

Yandex analytics is also a best analytics solution for a website. Even though these heat maps will not give you insightful information about your visitors behavior, but it is a simple heat map solution for a website.

If you found any errors or difficulty in using the above process, please let me know.
Read more ...

Thursday, 31 July 2014

Guide: How to Submit My Blog to Google, Bing, Yahoo and Yandex?


If you have a blog, then it must be submitted to search engines. You can do it by submitting to search engine's Webmaster. In simple words, Webmaster tools helps you to monitor and maintain the submitted sites presence in search engine results. We have analytics to measure our audience and this Webmaster tools will help you to optimize the performance of your blogs for better output from search engines.

In other way, we can say that you have to tell search engines that your blog is running and in order to get your posts indexed in any search engine, you should submit your blog or website to a search engine Webmaster.

There are mainly three search engines which offer Webmaster tools, and they are Google, Bing and Yandex. These three top search engines provide Webmaster tools services for free and other top search engines mostly depend on these three search engines.

In this post, I am going to show you the process of submitting your blog or website to these three major search engines. Let us start with the main search engine - Google.

1) Google Webmaster Tools:

Google's Webmaster tools is a free service which is offered by Google, where you can monitor the sites presence in Google search results. These tools will help to know the performance of your posts in Google's search engine results.

So, let us see how to submit a blog or website to Google's Webmaster tools.
  • At first, login to Google's Webmaster tools with your Google ID. If you do not have a Google account, create a new account.
  • After logging in, you will find an option called 'Add a Site'.


  • A new dialogue box will open and asks you to submit your blog. Go ahead and type the URL of your blog.


  • Then Webmaster tools will ask you to verify your ownership of your submitted blog. There you have two methods. One is 'Recommended Method' and another one is 'Alternate method'. Always choose recommended method because it will be easy for you to verify with the recommended method.


  • If you want alternate methods, click on alternate methods and choose your option.


  • After you successfully verify your ownership of that blog, go to dashboard of the blog you submitted on Webmaster tools. On your dashboard, you will see a red option saying 'ADD/TEST SITEMAP'. Click on it.


  • This is the main process you have to do after submitting your blog to Google. A sitemap is a XML file of your blog and we can say that this file is the skeleton of your blog. If you are submitting a WordPress blog, then sitemap will be like 'http://example.com/sitemap.xml'. And if you are submitting a blogger blog than the default site map will be 'http://example.blogspot.com/feeds/posts/default?redirect=false'. Type the URL of your blog's sitemap URL and click on 'Submit Sitemap'. You can also test whether your sitemap is valid or not by simply clicking 'TEST SITEMAP' option.


  • These sitemaps will help Google to index the posts, comments and everything of your blog and eventually it will help your posts to gain exposure through search engine results.


  • And that is it! you successfully submitted your blog to Google search engine. Always visit your Webmaster tools dashboard and see whether posts are indexing or not and look for any security issues or crawl errors compulsorily.

2) Bing Webmaster Tools:

This is another major search engine, which offers free Webmaster tools for optimizing your site for better performance on Bing search results. Bing's Webmaster tools help to index your blog on both Yahoo and Bing. Submitting to Bing is mandatory.

So, now lets see the process to submitting a blog to Bing Webmaster tools.
  • Go to Bing Webmaster tools page and sign up for a new Microsoft account and the login into Bing Webmaster tools with your new Microsoft account.


  • After logging in, you will see a 'Add a Site' box. Add the URL of your blog or website and click on 'Add'.


  • After adding, Bing asks to submit some information about your submitted website. It also asks your submitted blogs site map. You can see how your blogs sitemap will look from above Google Webmaster tools. Fill up the form and click on 'Save'.


  • Bing asks to verify ownership of the blog with any of the given three options. Choose your option and follow instructions of the process and click on 'Verify'.


  • After successfully verifying your ownership of the blog, you will be redirected to Bing's Webmaster tools dashboard.


  • That is it! You successfully submitted your blog to the Bing and Yahoo.

3) Yandex Webmaster Tools:

Yandex.ru is the largest search engine which is operated by Russian Internet company Yandex. This is an another search engine which provides Webmaster tools to the site owners. By submitting your blog to Yandex, your site will be indexed and Yandex shows your posts in search results.

Now we will see how to add a site to Yandex.ru.
  • Visit Yandex Webmaster tools homepage and you will see a big green button saying 'Start Work'. Click on that and log in with your Yandex account. If you do not have one, create an account which is very easy to create.


  • After creating a new account, login in with your Yandex account. At Webmasters dashboard, Yandex asks you to 'Add a New Site'. Click on the 'Add Site' green button.


  • You will add your site to Yandex in three simple steps. First one is to 'Add your Site'. Enter the URL of your blog or website and click on 'ADD'.


  • For second step, Yandex asks you to verify the ownership of the blog. For verifying your ownership Yandex gives four ways to verify. Choose your options and go through the instructions. Make sure you followed instructions correctly and click on 'Verify'.


  • After successfully verifying, you will be redirected to your new site's Webmaster tools dashboard. You have successfully added your blog to Yandex. Now it's time to add your blog's sitemap to Yandex.


  • On left side, click on Indexing options => Sitemap Files. Submitting your sitemap to Yandex is a little bit different. Unlike above two, Yandex has only one site map URL and that is 'http://example.com/sitemap.xml' for WordPress and 'http://example.blogspot.com/sitemap.xml' for blogger. After typing the link of your blog sitemap click on 'Add'. Yandex always prompts user to check the sitemap before submitting to it. If you want, check it.


  • And that is it you have successfully added your blogs site map to Yandex.

Conclusion:

Submitting your blog to these sites is very important, as to check the search engines crawling and indexing information of your blog. I've tried to submit another search engine 'Baidu.com' which is the largest search engine in china, but it is not letting me to add. So, I will update this post later.

So, that's it for now. If you have any doubts, like to add extra to make it more useful or found any typing errors, please let me know.
Read more ...

Friday, 11 July 2014

How to Add Disqus Commenting System to Blogger Blog?

Well, previously we have seen the process of adding 'LiveFyre' commenting system to a blogger site. In this post we are going to see the process adding 'Disqus' commenting system to a Blogger blog.

Most of the people prefer 'Disqus' over 'LiveFyre'. So, if you are one of them, please follow below steps to add 'Disqus' to Blogger.

Process of Adding Disqus to Blogger:
  • After signing in and filling your details, you will asked to choose a platform to install disqus. Choose 'Blogger'
  • Unlike 'LiveFyre', here we have Disqus blogger widget. You will be given setup instruction for 'Blogger' and choose first option to add Disqus widget to Blogger.
  • After adding widget, go to 'Step 2' to import existing comments to Disqus. If you don't have any comments, skip this step.
  • Go through 'Step 3' and see whether your template has 'Meta' tag or not. If it has follow instructions of 'Step 3' and if template don't have 'meta' tag simply skip Step 3.
  • Verifying is optional and 'Disqus' works without verification also.
  • And that's it! You successfully installed 'Disqus' to 'blogger.
Conclusion:

Now anyone can comment on 'Disqus' commenting system. If you have any problem in installing please let me know.

Read more ...

Tuesday, 8 July 2014

How to Add LiveFyre Commenting System to Blogger Blog?

Blogger blogs support Google Plus commenting system, but using Google Plus commenting system has many disadvantages. Most of the bloggers switch to commenting system of their blog template or to other commenting services. For that reason, in this blog post we are going to see the process to install 'LiveFyre' commenting system on your Blogger Template.

LiveFyre is one of the best commenting service for blogs. In this commenting system, users can link a word, use bold form, Italica form and even can share their comment on social media. So, lets see the process to add.

Process to Add LiveFyre to Blogger:
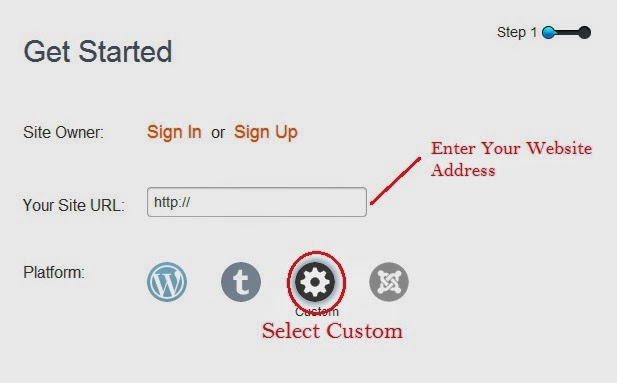
  • You will taken to a Form. Sing Up to the LiveFyre if you are new or Login to your existing LiveFyre account.
  • After logging in, type your web address where you want to place this commenting system.
  • Choose custom option as shown in below image.
  • After choosing, click next and you will be show HTML code which you have to place in your blogger template.
  • Now, open a new tab, go to your bloggers dashboard and select settings.
  • In 'Setting' choose 'Posts and Comments' and change your comment location to 'Hide'. (This is important)
  • Now click on 'Template' option which is right above 'Setting' and click on 'Edit HTML' option of your current template.
  • Now, in your template, search for below code.

<b:if cond='data:post.showThreadedComments'>

  • When you find, 'Copy' the HTML code of 'LiveFyre' and paste above the searched code.
  • Save template, visit any post of your blog and check the new 'LiveFyre' commenting system.
Conclusion:

So, above is the process to add 'LiveFyre' to your Blogger blog. If you have any doubts or any suggestion, please let me know.
Read more ...

Friday, 4 July 2014

EMTB 05: Adding Google Analytics and Google AdSense to Your Blog


Welcome to EMTB Series Part 5! In my last part, we have discussed about what,when and how to write content. In this post, we are going to discuss about adding Google Analytics and Google AdSense.

Google Analytics

Actually, we can create our Google Analytics account while changing settings of our blog. But I haven't stressed about Google Analytics because we have 'Stats' option to see our Analytics directly on Google dashboard.

Now, for better measurement of our visitors, we are going to add 'Google Analytics' to our blog .

To add 'Google Analytics', first visit http://google.com/analytics and click on 'Sign In' which is at top-right corner.

Log in with the same Google account which you are using for 'Blogger'

Click on 'Sign Up' and you will be shown a form. Fill in the form with the right information and click on 'Get Tracking ID' Accept 'Terms and Conditions' by pulling up the dialog box.

Now your 'Tracking ID' is shown. Copy the Tracking ID which starts with 'UA'.

Go to your Blogger Dashboard and click on Settings->Other.

Paste the ID in Google Analytics box.

That's It! It takes some time to show stats. So, check it later.

Google AdSense:

Google AdSense is the way to earn money from your blog. For Adding this to your blog, Go to your Blogger dashboard, search for 'Earnings' option and click on it.

You will taken to the AdSense window. Select 'Sing Up for AdSense' option.

Choose option with existing if you are new to AdSense.

Log In to your Google Account and you will be taken to 'Step 2'. Choose your preferred language and click on 'Continue'

Now, fill form with appropriate information and click on 'Submit My Application'.

After reviewing your application, Google may accept or decline you application based on many reasons. You must carefully read AdSense terms and conditions before submitting your application.

If they accept your application, go to your AdSense account, copy code and paste in ' HTML/Java' widget.

Done! You successfully added Google AdSense to your blog.

For China and India, the blog must be live for at least 6 Months before you apply for AdSense. So, for that reason, you must choose other alternative.

Conclusion:

If your blog is based in India, other advertising platforms are available. So don't worry!


Read more ...

Tuesday, 1 July 2014

Why Everyone Should Choose Domain Privacy Option While Registering a Domain Name


What is Domain Privacy?

The Internet Corporation for Assigned Names and Numbers (ICANN) is the non-profit organisation which takes the responsibility of the Internet's global domain name system. According to ICANN, whenever a domain is registered, contact information must be submitted to it, along with the registration. The submitted contact information will be made publicly available through a WHOIS Search.

Here, we can see that the contact information is made public and can be seen by anyone who searches our domain name in WHOIS search. In that way, people can know our personal information which we do not want others to see. So, for not making our information public, we have to opt for domain privacy option while registering for a Domain.

Why you Should opt for Domain Privacy option while Registering Domain?

While registering our domain, we will give our personal details to the registrar for registering a domain. If you give your office information while registering domain, it may not affect your privacy as that information should be known to everyone as it is a business address. But, if you are registering as an individual giving your personal information like your door number, personal mobile number, it will be very risky.

To avoid that risk, hosting services will show their company details as the registrar of that domain. In this way, both registrar and user will be benefited.

So, to avoid risk, everyone should opt for domain privacy option while registering.

Which services provides the domain privacy option?

Most of the domain and web hosting services provide domain privacy option. When it comes to our recommended hosting services, Bluehost, DreamHost and HostGator also provide domain privacy option.

HostGator provides domain privacy for $9.95 and Bluehost provides domain privacy from $10.99 per year. And when it comes to DreamHost, domain privacy option is free!

Conclusion:

If you are serious about privacy of your domain and you, you should think about domain privacy.
Read more ...
Yandex.Metrica