Showing posts with label Blogging. Show all posts

Friday, 11 July 2014

How to Add Disqus Commenting System to Blogger Blog?

Well, previously we have seen the process of adding 'LiveFyre' commenting system to a blogger site. In this post we are going to see the process adding 'Disqus' commenting system to a Blogger blog.

Most of the people prefer 'Disqus' over 'LiveFyre'. So, if you are one of them, please follow below steps to add 'Disqus' to Blogger.

Process of Adding Disqus to Blogger:
  • After signing in and filling your details, you will asked to choose a platform to install disqus. Choose 'Blogger'
  • Unlike 'LiveFyre', here we have Disqus blogger widget. You will be given setup instruction for 'Blogger' and choose first option to add Disqus widget to Blogger.
  • After adding widget, go to 'Step 2' to import existing comments to Disqus. If you don't have any comments, skip this step.
  • Go through 'Step 3' and see whether your template has 'Meta' tag or not. If it has follow instructions of 'Step 3' and if template don't have 'meta' tag simply skip Step 3.
  • Verifying is optional and 'Disqus' works without verification also.
  • And that's it! You successfully installed 'Disqus' to 'blogger.
Conclusion:

Now anyone can comment on 'Disqus' commenting system. If you have any problem in installing please let me know.

Read more ...

Tuesday, 8 July 2014

How to Add LiveFyre Commenting System to Blogger Blog?

Blogger blogs support Google Plus commenting system, but using Google Plus commenting system has many disadvantages. Most of the bloggers switch to commenting system of their blog template or to other commenting services. For that reason, in this blog post we are going to see the process to install 'LiveFyre' commenting system on your Blogger Template.

LiveFyre is one of the best commenting service for blogs. In this commenting system, users can link a word, use bold form, Italica form and even can share their comment on social media. So, lets see the process to add.

Process to Add LiveFyre to Blogger:
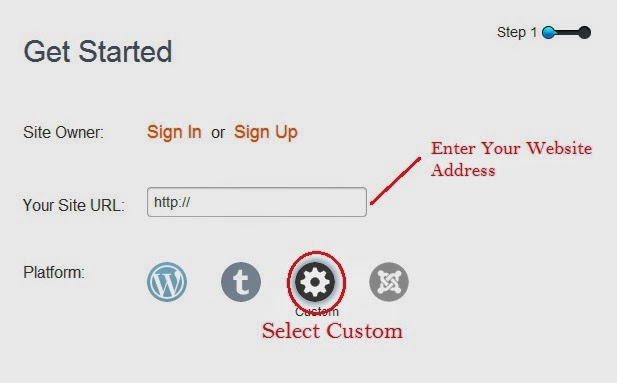
  • You will taken to a Form. Sing Up to the LiveFyre if you are new or Login to your existing LiveFyre account.
  • After logging in, type your web address where you want to place this commenting system.
  • Choose custom option as shown in below image.
  • After choosing, click next and you will be show HTML code which you have to place in your blogger template.
  • Now, open a new tab, go to your bloggers dashboard and select settings.
  • In 'Setting' choose 'Posts and Comments' and change your comment location to 'Hide'. (This is important)
  • Now click on 'Template' option which is right above 'Setting' and click on 'Edit HTML' option of your current template.
  • Now, in your template, search for below code.

<b:if cond='data:post.showThreadedComments'>

  • When you find, 'Copy' the HTML code of 'LiveFyre' and paste above the searched code.
  • Save template, visit any post of your blog and check the new 'LiveFyre' commenting system.
Conclusion:

So, above is the process to add 'LiveFyre' to your Blogger blog. If you have any doubts or any suggestion, please let me know.
Read more ...

Friday, 4 July 2014

EMTB 05: Adding Google Analytics and Google AdSense to Your Blog


Welcome to EMTB Series Part 5! In my last part, we have discussed about what,when and how to write content. In this post, we are going to discuss about adding Google Analytics and Google AdSense.

Google Analytics

Actually, we can create our Google Analytics account while changing settings of our blog. But I haven't stressed about Google Analytics because we have 'Stats' option to see our Analytics directly on Google dashboard.

Now, for better measurement of our visitors, we are going to add 'Google Analytics' to our blog .

To add 'Google Analytics', first visit http://google.com/analytics and click on 'Sign In' which is at top-right corner.

Log in with the same Google account which you are using for 'Blogger'

Click on 'Sign Up' and you will be shown a form. Fill in the form with the right information and click on 'Get Tracking ID' Accept 'Terms and Conditions' by pulling up the dialog box.

Now your 'Tracking ID' is shown. Copy the Tracking ID which starts with 'UA'.

Go to your Blogger Dashboard and click on Settings->Other.

Paste the ID in Google Analytics box.

That's It! It takes some time to show stats. So, check it later.

Google AdSense:

Google AdSense is the way to earn money from your blog. For Adding this to your blog, Go to your Blogger dashboard, search for 'Earnings' option and click on it.

You will taken to the AdSense window. Select 'Sing Up for AdSense' option.

Choose option with existing if you are new to AdSense.

Log In to your Google Account and you will be taken to 'Step 2'. Choose your preferred language and click on 'Continue'

Now, fill form with appropriate information and click on 'Submit My Application'.

After reviewing your application, Google may accept or decline you application based on many reasons. You must carefully read AdSense terms and conditions before submitting your application.

If they accept your application, go to your AdSense account, copy code and paste in ' HTML/Java' widget.

Done! You successfully added Google AdSense to your blog.

For China and India, the blog must be live for at least 6 Months before you apply for AdSense. So, for that reason, you must choose other alternative.

Conclusion:

If your blog is based in India, other advertising platforms are available. So don't worry!


Read more ...

Sunday, 29 June 2014

EMTB 04: What to Write, When to Write and Why to Write?


Motivation: The secret of getting ahead is getting started - Mark Twain

Welcome EMTB Series, Part 4! In my previous part, I explained about Uploading a Free Blogger template and customizing your blog. Now, in this post, I'm going to tell you the ways to choose content and frequency of writing content.

So, lets start!

STEP ONE: Choosing Content (What to Write?)

Well, we created our blog, added some pages, updated template which suits our blogs content. Now its time to write our first post. Most of the content we write mainly depends on our niche. If your blog is about news, you know what to write! If it is about photography, you have to write about photography and its related information.

So, if you are starting, you will have so much to write. Start from basics and go for other related topics later. Like, If you are writing about Photography, you have to first make content about photography and go for its related products or things.

Always keep in mind! WRITE TO HELP! (Why to Write?) Whatever you write, it must help people. At first, people visit your blog, if your blog produces informative and helpful content. Search Engines are the first Sources to get traffic for your blog. So, write informative content first and later, you can make some experiments on producing content in different ways.

STEP TWO: Frequency of Producing Content (When to Write?)

This is the most important step to follow for up-liftment of your blog. Most of the New Bloggers start a blog, write one or two posts and stop writing (Even I used to do Like that!). You should not do like that, produce content regularly, either on Weekly or Daily basis. I don't recommend Monthly or Weekly basis if you are trying to earn some through it. If you earned identity, the process may change but, when you start a new blog, produce content on daily basis.

STEP THREE: Sharing Your Content

Share your content on your blogs Social Media profiles and create a friendly environment on Social Media profiles, like following back on Twitter if any one follows you, liking others Facebook posts related to your niche, commenting and more.

CONCLUSION:

Each and everything has a process to be followed. I will write in detail about each topic in my later posts. Stay tuned to know about the process and ways I use for getting better results.

Follow Pix to Share!
Read more ...

Friday, 27 June 2014

EMTB 03: Uploading Free Blogger Template and Customizing Your Blog


Welcome to EMTB Series Part 3! EMTB stands for Earning Money Through Blogger, a series of post on 'Making Money Through Blogger', a Free Blogging platform which can be used to make money.

In my previous part i.e., part 2, we created our blog and changed some settings. Now in this part, I'm going to show you the way to upload a Free Blogger theme, adding gadgets and preparing your blog to write your first post.

OK, lets start!

STEP ONE: Uploading a Free Blogger Template

As we created our blog, now its time to upload a free template to it. For finding a Free blogger template, just Google search 'Free Blogger Templates'. And you will see many links to free templates for your blog.

Just choose the template which perfectly matches to your blog and the content you are going to post. Like, if you want to write about 'News', choose a 'News' related template or Magazine template etc. Or you can choose from templates which Blogger recommends.

Process to Upload a Template:


First download your free template to your computer.

Unzip the template if it comes in Zipped file.

Open your blogs dashboard and look for 'Template' option and click on it.


After opening it, you will find an option 'Backup/Restore' at top-right side corner. Click on it.


You will see a dialog box like below screenshot. Click on 'Choose File', select your unzipped template (Look for .xml file) and then on 'Upload' button.


And that's it! Template will be uploaded and applied to your blog.

STEP TWO: Changing Layout and Adding Widgets

Now you can look at your new blog with new Free blogger template by clicking on 'View Blog'.

Its time to change layout to add widgets and to complete your blog to start posting.

To edit layout, click on 'Layout' option which right above 'Template' option. You will see the layout of your blog and it lets us to add widgets,


Now click on each edit option to add what you want at that place like for m blog I want to add social media icons at that place.

If you want to add HTML/Java scripts to the widget, Simply search for 'HTML/Java Scripts' after clicking on 'Edit' button and paste your code. This process is simple and there is no need to explain each option. If you have any doubt, please mail me or comment so that I can help you.

Process to Customize and to Edit HTML of Your Uploaded Template:

This is important! After setting up your layout, its time to customize or edit HTML to add some features.

Go to 'Template' option again and you will notice two options, one is 'Customize' and other one is 'Edit HTML' 

Click on customize and look if your blogger template supports some customization's like background, Width, Layout etc. and choose option to do some changes in fonts, updating your social media profiles etc.

STEP THREE: Other Important Additions for Your Blog

Now, its time to add About, Contact pages.

Its easy to create About page but for adding 'Contact' page to a page, follow this tutorial from BloggerPlugins.

Adding 'Privacy Policy' and 'Terms of Services' are must for accepting for 'Google AdSense'. So to create them, please visit 'Bennadel', where you can generate Free Terms of Service and Privacy Policy.

That's it! You are ready to post from now on wards.

CONCLUSION:

Uploading Template and editing it is a bit difficult. So, it takes time and requires some research when you needed help. So, be patient.

I've completed my 'PixtoShare' site with full steps which I discussed above. So, have a look at it.

If you have any doubts, please let me know.
Read more ...

Thursday, 26 June 2014

EMTB 02: Creating Your New Blogger Blog and Changing its Settings


Motivation: In order to succeed, we must first believe that we can. - Nikos Kazantzakis

Welcome to EMTB Series Part 2! EMTB stands for Earning Money Through Blogger, where I will show to earn money from Free blogging platform Blogger. In the previous part, I discussed about the way to choose a topic for your blog. In this part, I will show you to create and upload a Free template for your Blog.

As I said in my EMTB series last post, I'm wanted to create a blog based on current trends. So, I chose one and I'm blogging about 'SHARABLE IMAGES'. Yes, I want to run an 'image with information' blog.

Most of the people share Images and posts which are mostly based on images. Most of the Google Plus users upload Memes or Photography where they are getting more shares. On Pinterest, people like to pin awesome pictures. When it comes to Facebook and Twitter, people like to share informative posts and if they have images, that post may go well.

And other than above reason, I like to include viral photos in a post. So, that's the reason I chose photo sharing blog.

Now lets sign up for Blogger and create our own blog!

STEP ONE: Sign Up for Blogger

You can use a single Gmail account for all the Google services. So, create a Gmail account if you don't have one by visiting Google Mail.

After creating your Gmail account, go to 'http://blogger.com' and sign in with your new Gmail account.

STEP TWO: Create Your New Blog

In up-left corner of your new Blogger dashboard, you will see an option which reads 'New Blog'. Click on that to create your new blog.

As in my previous EMBT Post, I suggested the ways to choose Title and URL for your blog. After brainstorming and doing hard work in choosing your Title and URL, Type your blog title.

And creating your URL will be harder, type the name you want as URL, If that URL is available, you can create but if that URL is not available, you have to choose other alternative basing on your chosen URL. As I want to create a Images sharable blog. So, I came up with many URL's like,
  • picturestoshare.blogspot.com
  • imagestoshare.blogspot.com
  • sharingimages.blogspot.com
  • picstoshare.blogspot.com
And so on.

At last, I found one and that URL is 'PIXSTOSHARE'. Yes, 'pixtoshare.blogspot.com'.

If the URL you typed is available, then click on the button 'Create Blog!'

Congratulations! You created your first Blog. (I too!)


STEP THREE: Setting of Your New Blogspot Blog

Well, there is nothing to change or Modify much. All are basic options.

Click on the tile of your new blog, where you will see your new Blog dashboard. On left side of dashboard, you will see different options (I will explain each option later) and click on the last option 'Settings'

Click on 'Basics' and click on 'Edit' next to 'Description' to write about description of your blog. (This is important)

Click on 'Language and Formatting' to change language of your blog and time zone of your blog.

And this is important, If your blog have or going to have 'Adult Content' (Which I strongly NOT Recommend) Change option from 'NO' to 'YES' for Adult Content.

I will talk about 'Google Analytics' option later.

CONCLUSION:

So, Here we learned,
  • To create our new blog.
  • Changed settings.
I changed the setting of my new blog 'pixtoshare.blogspot.com' and I'm eager to start my blog and to earn from it. Stay tuned for more posts! 
Read more ...

Wednesday, 25 June 2014

EMTB 01: Choosing Your Blog Topic


Motivation: Always do your best. What you plant now, you will harvest later. (Og Mandino)

Welcome to EMTB series! EMTB stands for Earn Money Through Blogger, which I started to show that even a free blog can earn some money if done perfectly. But before starting, I want to tell you that this is not an overnight business and it will take some time to earn money. You have to be regular and well planned to get some results, either in the form of traffic or money.

This is the first part of the series where I am going to show you the elements required for choosing the title and best URL for your blog. So, lets begin!

STEP ONE: What Topic do you Want to Blog For?

This is the basic step which everyone should follow. As the title says, what topic do you want to blog for? What is your passion for? What are you interested about? These are the questions you should ask yourself before creating a blog.

If you cannot select one topic, then go for the topic which you interested to think and happy to work at any time. By basing on two things you must always choose the topic, one is PASSION and another one is CURRENT TREND.

When it comes to passion, you have to select topic based on your interests. If you like to write about Bikes, go for Bike and select sub-categories like Super Bikes, Super Bikes or all of them.

If you like to create a blog based on current trend, you have to observe present trend from different sites. Based on your research choose a topic and create a blog.

STEP TWO: Content Oriented Blog or Casual Blog?

If you want to create a content oriented blog, you must be careful about selecting the topic, knowing your competition and the products which are available to promote. These content blogs are very useful as these are SEO friendly blogs, means the article you post will be indexed in the Google and whenever search for a keyword is made, chances are higher to show up your article in Google results.

If you want to create a blog based on current trends like casual blogs, carefully observe everything on Internet, social media etc. and choose the topic which you think will be best for you.

Mainly, blogger blogs are created to share their personal information. I have seen many blogger blogs which are either fashion blogs or personal blogs. But create blog in any category you want.

STEP THREE: Create an Awesome URL and Title for Your Blog.

If you successfully completed about two steps, then this is the final step to choose perfect blog title and URL for the topic you chose.

Choosing a title and URL for content oriented blogs is very difficult and should be very careful in choosing. This content oriented blogs are completely based on the search results, you should choose an URL which has less competition and high search results.

You can select the best URL by some research in free keyword tool by Google and typing the topic in Google Search, Bing and Yahoo to see the suggested searches made by people.

CONCLUSION:

Those three steps are very important for creating a blog. And I want to list out some points which are very important.
  • Choose topic based on your passion.
  • Mostly, Blogspot blogs are personal or fashion blogs. It is not limited to that two categories, you can select any type of category you want and keep in mind that you can migrate it to.com or any other domains later.
  • Always research about whatever topic you choose in your market and the competition you have, products available to promote.

As I show you by creating my own blog, I like to create a blog which uses one category from the current trends. As I have already two content blogs Aal-productZ and Attractive Blogger, I want to create current trend based blog.

Stay tuned to this EMTB series, where in my next post, I show you to create a Blogger Blog with free template.
Read more ...

EMTB: Introduction

Whenever you Google search about 'Make Money by Blogging', you will end up with number of results where majorly of them discuss about making money through WordPress blog. But, when I searched for 'Make Money by Blogging using Blogspot', I haven't found any better results which may clearly explain about making money using blogger.

For this reason, I want to start a 'EMTB' (Earn Money Through Blogger) series of posts regarding making money using Blogspot. Here, I will teach about blogging using Blogspot domain by creating my own blogger blog and showing live results. In this way I can clearly show that people can make money by using blogger.

The only reason why I chose blogger is that it is always FREE. As it is Free, you don't need to sen a dime in creating and promoting. If you are determined and disciplined about blogging, you can make money even through a free blog hosting service like Blogger Blogspot.

So, from next post on words. I will teach you by creating and showing what I am doing for the blog I created. If you are new to Blogger Blogspot, create a blog now and follow this series or if you are experienced blogger, please tip us!

Hope for the Best!
Read more ...
Yandex.Metrica